So You Want to Build an AI Agent with n8n. Where Do You Even Start?
There’s a paradox at the heart of modern AI adoption: the tools have never been more powerful, yet most businesses still haven’t automated a single meaningful workflow. The gap isn’t intelligence, it’s execution.
That changes with n8n.
n8n is a low-code workflow automation platform that has quietly become the go-to choice for teams that want to build real, production-grade AI agents, without hiring a full engineering squad or paying eye-watering SaaS fees. Its open-source community edition is free to self-host and its native AI nodes make building n8n AI agent workflows genuinely accessible.
In this tutorial blog, we’re going to walk through exactly how to build your first AI agent from scratch, the same way n8n’s own educators teach it. We’ll construct a 2-part system: a web form that ingests question-and-answer pairs into a knowledge base and a chat-driven AI agent that uses that knowledge base to answer questions intelligently, without hallucinating.
💡 Expert note: At Dextralabs, our AI agent development team uses n8n as a core orchestration layer for enterprise automation pipelines. What you learn here mirrors the fundamentals we apply at production scale.
You’ll also find related reading in our guides on AI agent development and how to build AI agents — both worth bookmarking alongside this tutorial.

You Can Build It. We Can Scale It.
Dextralabs turns n8n prototypes into production-grade AI agent systems — integrated, monitored, and built to last.
Talk to Our AI TeamBefore You Begin: What You’ll Need?
This guide assumes a small amount of technical comfort, you don’t need to be a developer, but you should be comfortable navigating web interfaces and reading simple logic. Here’s what to have ready:
- n8n installed — self-hosted community edition (free) or n8n Cloud free trial
- An LLM API key — OpenAI works out of the box; n8n Cloud accounts get free OpenAI credits to start
- n8n version 2.73 or later — the team ships updates weekly, so minor UI differences are normal
- A use case in mind — even if it’s just following along with ours
Not sure how to install n8n? The official documentation covers every setup path in detail.
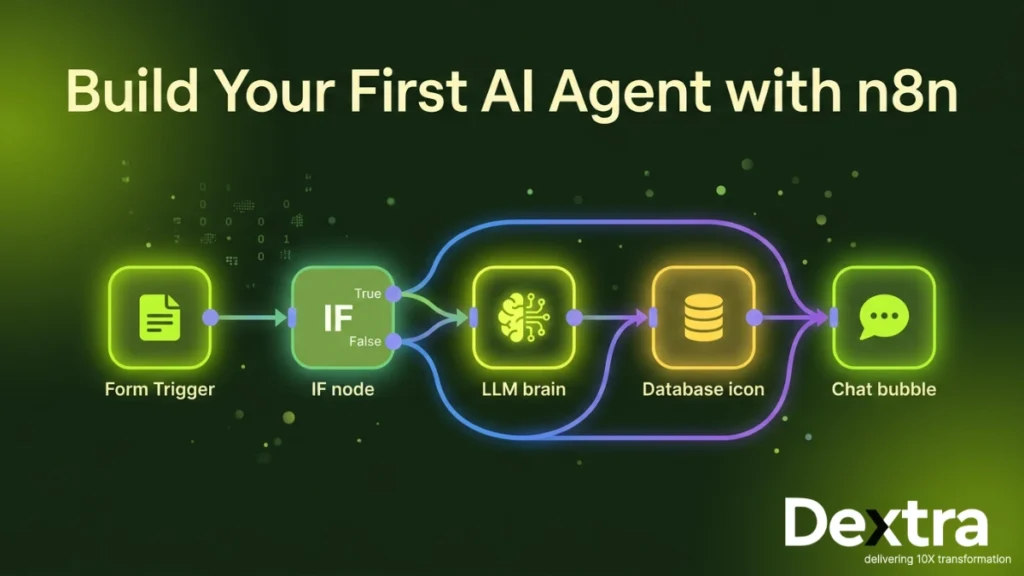
What Are We Building? The Full Picture
Our project has two distinct workflows that work in tandem:
- The QA Ingest Workflow — A web form that captures question-answer pairs submitted by users, enriches them with metadata (trusted source flag, AI-generated tags) and stores them in an n8n data table.
- The AI Agent Workflow — A chat interface powered by an AI agent that queries the data table to answer user questions accurately, grounded in real data rather than model hallucination.
This architecture reflects a pattern used across thousands of real-world deployments: a structured ingestion layer feeding a retrieval-augmented AI layer. It’s simple to build in n8n and scales elegantly.
🏗️ Architecture insight: This two-workflow pattern — ingest + query — is the foundation of what Dextralabs calls a “grounded agent” system. See our deep dive on scalable AI agent architecture for a production-grade version of this pattern.
Part 1: Building the QA Ingest Workflow
Step 1 — Create the Workflow and Name It
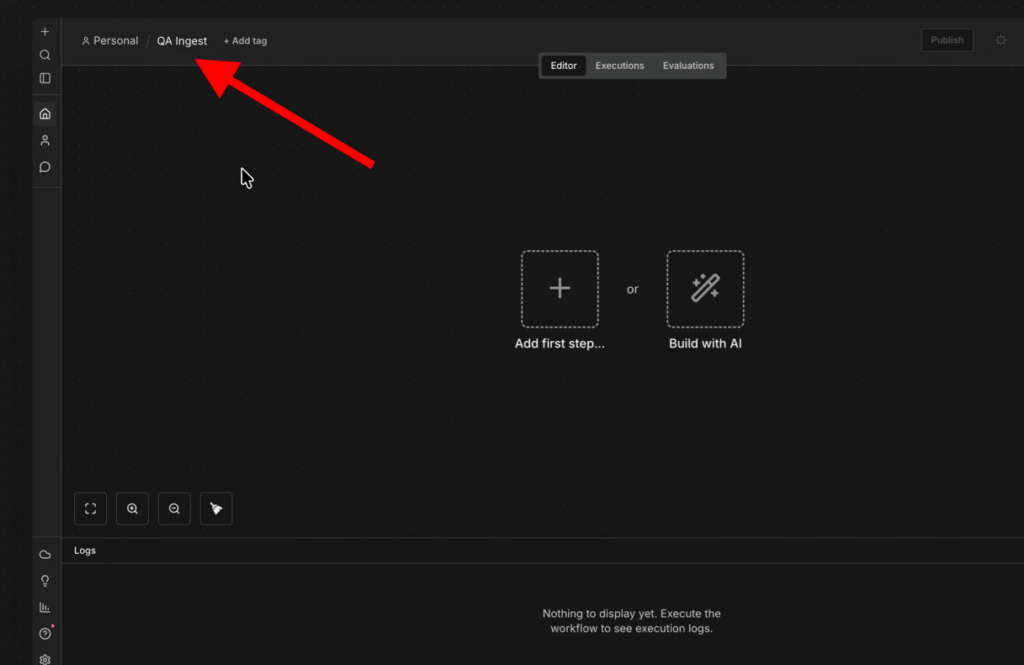
Open n8n and start from a blank canvas. The first thing you should always do is give your workflow a clear name. We’ll call ours QA Ingest. This habit becomes invaluable as your workspace fills with dozens of workflows.
Step 2 — Add the Form Submission Trigger
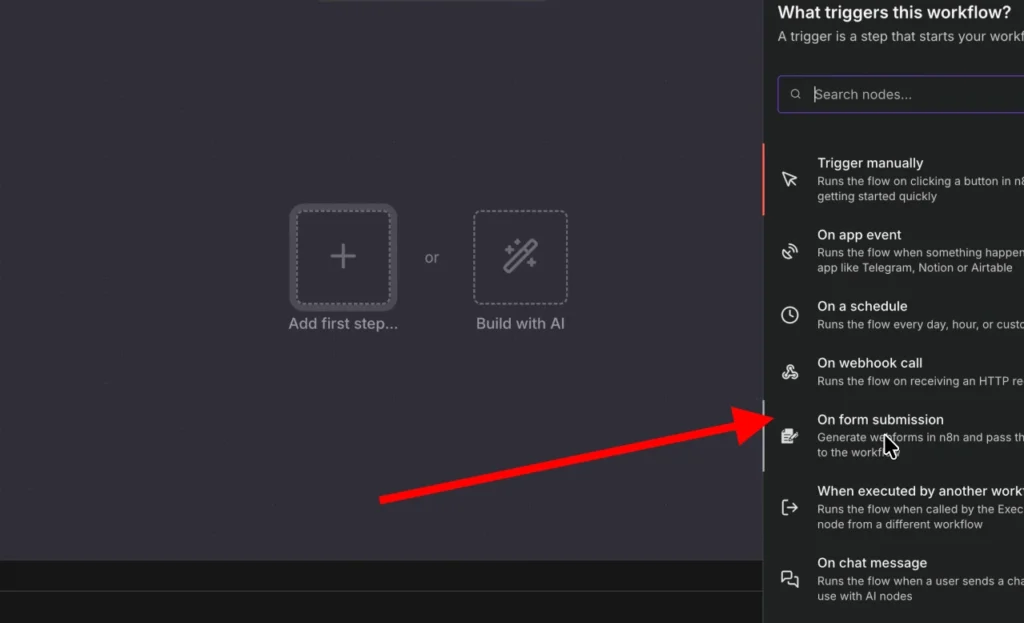
In n8n, every workflow begins with a trigger — the event that kicks everything off. For our use case, we want to collect structured input from a user, so a web form is perfect.

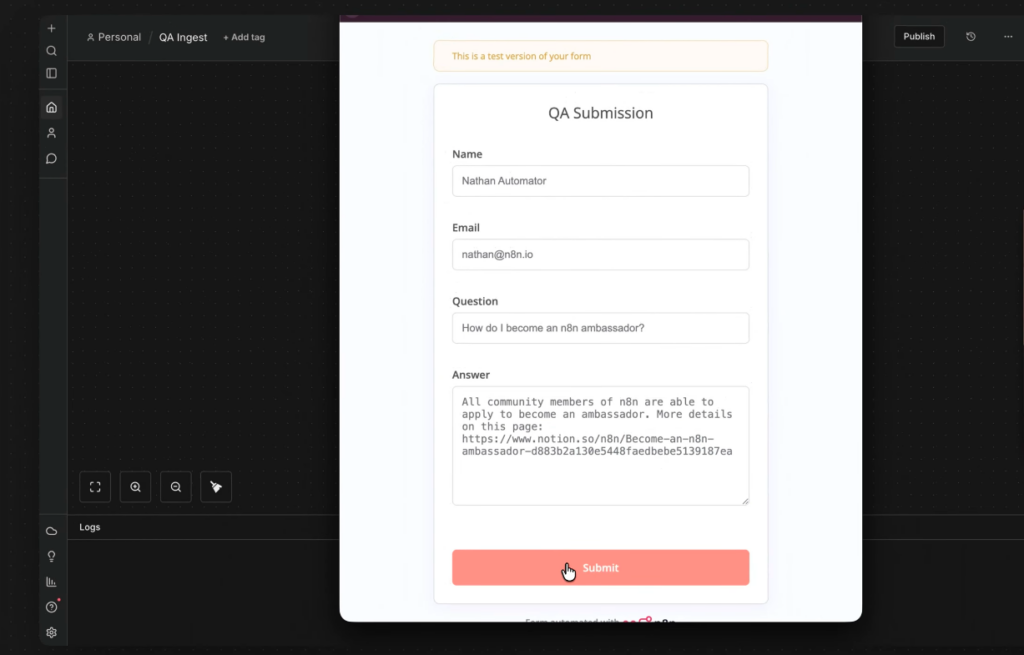
Search for the On Form Submission trigger and drag it onto the canvas. Configure it with the following fields:
- Name — Text input
- Email — Text input (we’ll use this for trust logic)
- Question — Text input
- Answer — Text area (allows longer content)
Set the form title to QA Submission Form, leave the response setting as-is (“Respond when form is submitted“) and you’re done with the trigger.
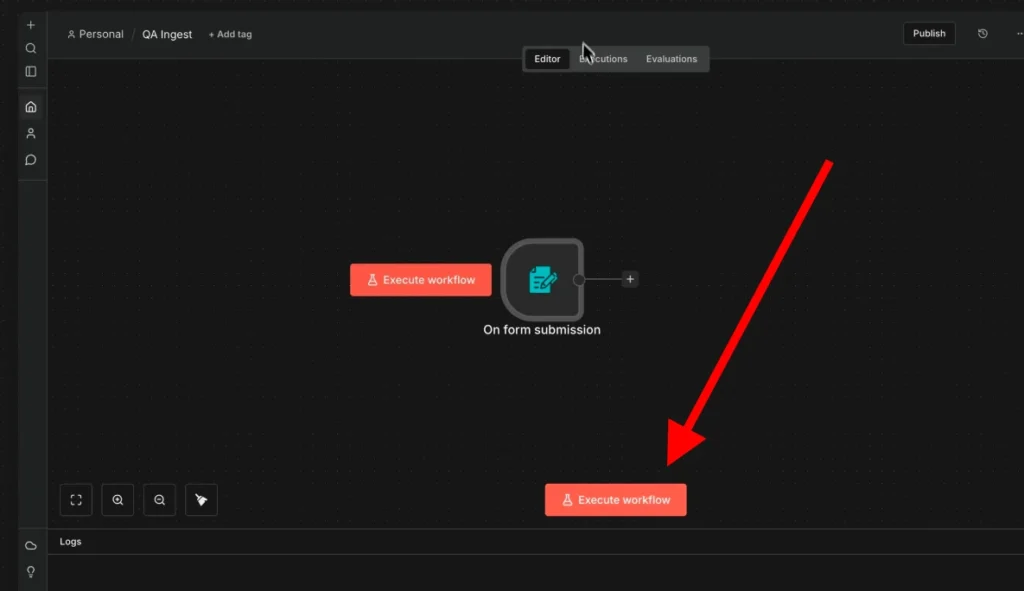
Hit Execute Step to open a test form. Fill it in with sample data, something like asking how to become an n8n ambassador and then submit. Back in the workflow, you’ll see one item of data has passed through the trigger. Pin that data so you don’t need to refill the form every time you test.
📌 Pro tip: Pinning test data is one of n8n’s most underrated features. It lets you iterate on your workflow logic without repeating manual inputs every single time.
Step 3 — Add Conditional Logic with the IF Node
Now we want to tag each submission with whether it comes from a trusted source. Our rule: if the email contains @n8n.io, it’s a trusted internal submission.
Add an IF node from the Flow section. Configure it like this:
- Value 1 — Drag and drop the email field from the trigger output (this sets it as a dynamic expression)
- Condition — Contains
- Value 2 — n8n.io
Run the node — submissions with n8n.io emails route to the True branch; everything else routes to False. Clean and simple.
This is a great moment to understand a core n8n concept: items. Every node in n8n works on an array of items. Each node performs its action once per item by default, so you never have to write explicit loops. This is the paradigm shift that makes n8n feel so fluid once it clicks.
Step 4 — Append Metadata with Edit Fields Nodes
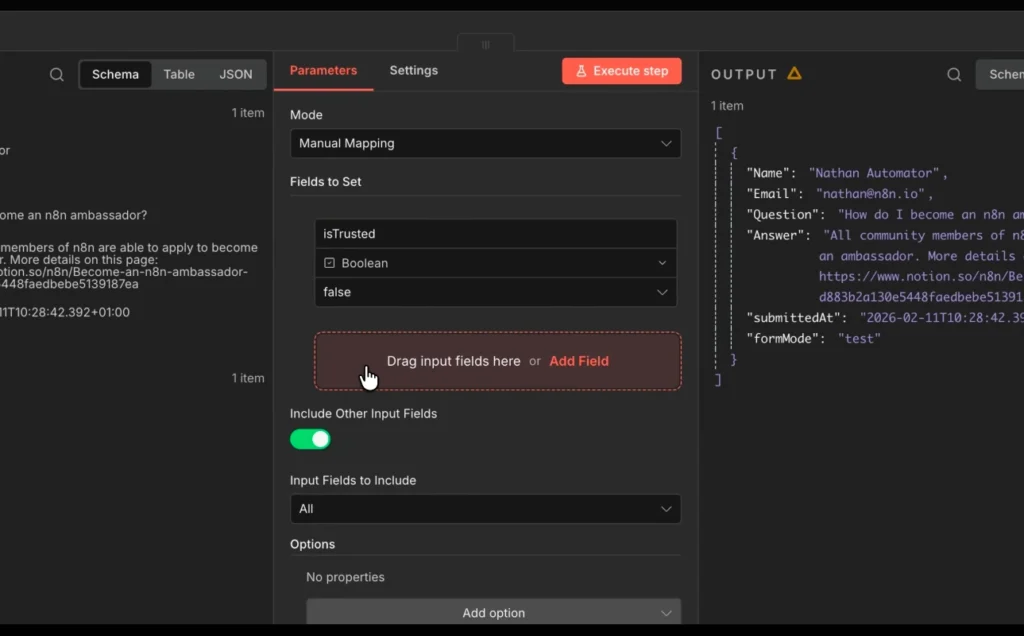
Add an Edit Fields node to the True branch. Enable “Include Other Input Fields” so all existing data passes through unchanged. Then add a single new field:
- Field name — isTrusted
- Type — Boolean
- Value — true
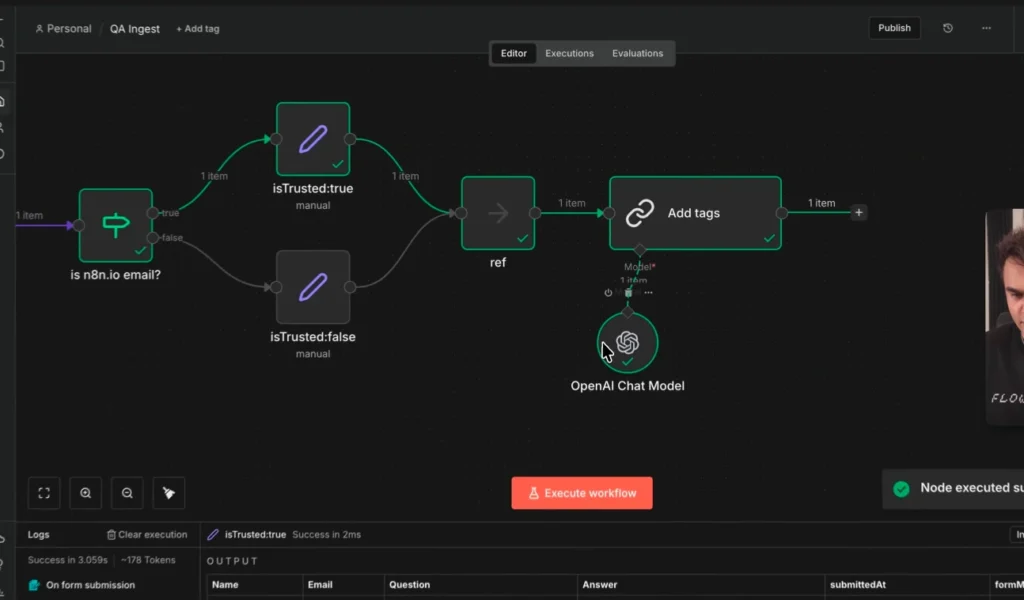
Rename this node to is_trusted_true. Duplicate it, attach it to the False branch and set isTrusted to false. Rename that one is_trusted_false.
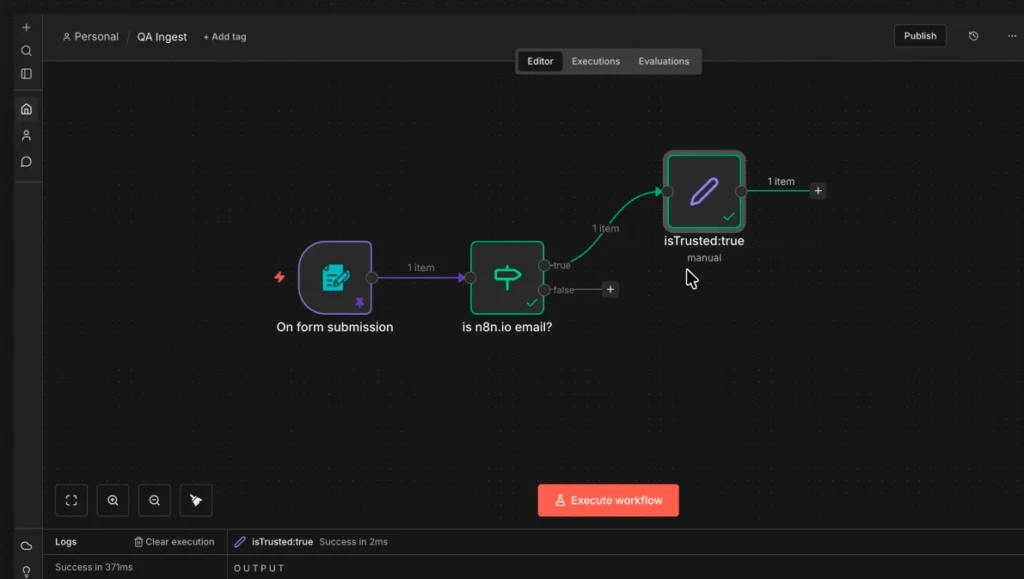
Now add a No Operation node (found by searching “no op”) and connect both branches to it. Rename it ref. This reference node becomes your clean anchor point for downstream steps — whichever branch a submission took, you can always reference data from ref without worrying about which path it came through.
Step 5 — Enrich with AI-Generated Tags
Here’s where things get interesting. Before storing the submission, we want to enrich it with semantic tags generated by an LLM. Why? Because when the AI agent later searches the knowledge base, it uses fuzzy matching — having rich tags dramatically improves retrieval accuracy.
Add a Basic LLM Chain node from the AI section. This is the most fundamental AI building block in n8n — a direct call to a language model with a prompt you define.
Attach an OpenAI Chat Model as a sub-dependency (connect it to the AI Model port). If you’re on n8n Cloud, your free OpenAI credits apply here automatically.
Inside the Basic LLM Chain node:
- Rename it to add_tags
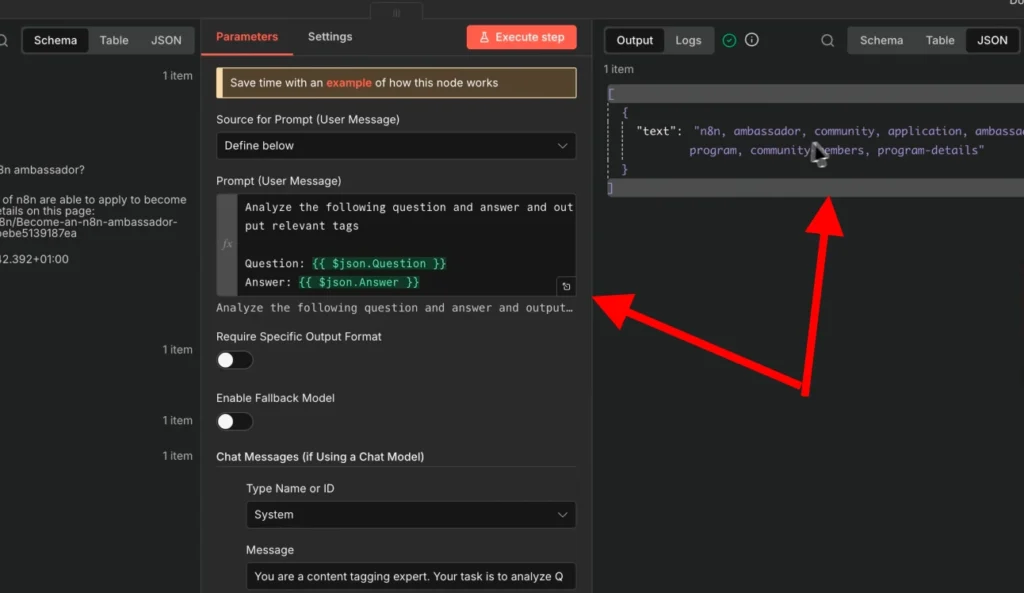
- User message — Set to “Define below“, then write: Analyze the following question and answer and output relevant tags.
- Dynamically inject {{question}} and {{answer}} fields from your workflow data into the prompt using expressions.
- System prompt — Add a role-based instruction: “You are a content tagging expert. Your task is to generate concise, relevant tags from Q&A content. Output only a comma-separated list.” (Expand with examples for better results.)
Run the node. You’ll see it outputs a comma-separated list of contextual tags — perfect for populating a tags column in our database.
Step 6 — Store Everything in an n8n Data Table
Navigate to your n8n account’s personal section and open Data Tables. Create a new table called q_and_a with the following columns:
- name (text)
- email (text)
- question (text)
- answer (text)
- tags (text)
- isTrusted (boolean)
Back in the workflow, add a Data Table node and set the action to Insert Row. Select the q_and_a table and map your fields:
- Drag tags from the add_tags node output into the tags column
- Expand the ref node and map name, email, question, answer
- Map isTrusted from the ref node (boolean to boolean — it auto-resolves)
Run the full workflow. Check your data table, you should see the row populated correctly. Your ingest pipeline is complete.
Publish this workflow as V1. It’s live.
Part 2: Building the AI Agent Workflow
Now for the fun part. Create a new workflow, this is the brain of the operation.
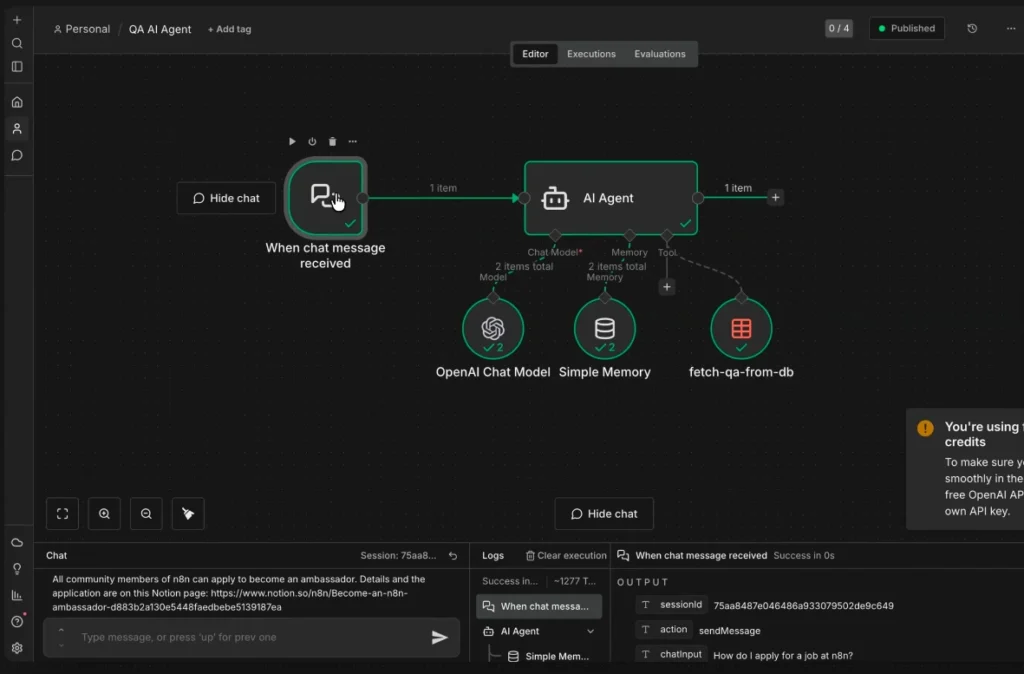
Step 1 — Add the Chat Trigger
Add an On Chat Message trigger. This trigger is specifically designed for conversational AI interfaces, it captures the incoming chat message and generates a session ID that lets the agent track multi-turn conversations.
Click the Test Chat button to open an inline chat panel. Send a test message. You’ll see the session_id and chatInput fields in the trigger output. These are the two most important fields for everything that follows.
Step 2 — Add the AI Agent Node
The AI Agent node is n8n’s most powerful AI primitive. Unlike the Basic LLM Chain (which just calls a model with a prompt), the AI Agent can reason, plan, and decide which tools to invoke, iterating until it has enough information to answer the user.
Add an AI Agent node and connect it to the chat trigger. Set the prompt source to default (chat trigger mode).
The AI Agent needs three things connected to it:
- An LLM — Add OpenAI Chat Model again. This is the agent’s reasoning engine.
- Memory — Add a Simple Memory node. This lets the agent remember the conversation across multiple messages, keyed by session_id. Connect it to the Memory port.
- A Tool — This is how the agent interacts with your knowledge base. We’ll configure this next.
Step 3 — Configure the Data Table Tool
Add a Data Table node via the tool connector on the AI Agent. This is the agent’s window into your knowledge base.
Configure it as follows:
- Action — Get Many Rows
- Table — q_and_a
- Tool description — Write a clear, specific description: “Use this tool to search the Q&A knowledge base. Provide a search query matched against the question column to find relevant answers.”
Add two filter conditions and mark both as AI-populated (click the magic wand icon):
- Condition 1 — question column, contains (case-insensitive), value = AI-generated query. Description: “Use the most relevant keyword from the user’s question. Use one term per invocation.“
- Condition 2 — tags column, contains, value = AI-generated tag. Description: “Use a single, specific tag term. Multiple tags in one call will reduce match accuracy.”
Rename the tool to fetch_QA_from_db. The name matters — it’s what the AI agent sees when deciding whether to invoke this tool.
Step 4 — Write the System Prompt
The system prompt is the instruction manual for your AI agent. Without it, the agent might hallucinate answers instead of querying the database. Add one directly in the AI Agent node:
You are a QA assistant for [your organization]. When a user asks a question, always use the fetch_QA_from_db tool to search the knowledge base first. Synthesize a clear, helpful answer from the results. If no relevant answer is found in the database, tell the user you don’t have that information — do not guess or fabricate an answer.
This single instruction does three things: defines the agent’s identity, enforces tool usage, and prevents hallucination. These three elements belong in every production AI agent system prompt.
Step 5 — Test the Full Agent
Clear the test chat session and ask: how become n8n ambassador (deliberately poor grammar — real users don’t always write perfectly).
Watch the agent work. In the execution logs, you’ll see it:
- Check memory for existing conversation context
- Decide to invoke the fetch_QA_from_db tool
- Search by keyword (e.g., “ambassador”)
- Receive results from the data table
- Synthesize and return an accurate, grounded answer
No hallucination. No made-up links. Just the answer — because it came from your data.
Step 6 — Publish and Share
Publish the workflow as V1. Then open the chat trigger settings:
- Public URL — Toggle this on to get a shareable link anyone can use
- n8n Chat Hub — Enable this to make the agent available inside n8n’s native chat interface, accessible to all users on your account
Re-publish as V2. Your AI agent is live.
Understanding n8n Execution Logs (And Why They Matter)
After testing via the chat hub, go to the Executions view of your workflow. You’ll see each run listed — test executions show a beaker icon; production runs don’t.
Click any execution to explore it. You can double-click the AI Agent node and review exactly which tool calls it made, what queries it used, what results came back, and how it synthesized the final answer. This level of observability is rare in AI tooling — and it’s one of n8n’s most underappreciated strengths.
Even better: you can copy a production execution back to the editor, pin its trigger data, tweak your system prompt or tool configuration, re-run it, and compare outputs — all without touching production.
Key Concepts to Carry Forward
Triggers vs. Actions
Every n8n workflow starts with a trigger (an event that initiates the flow) and proceeds through actions (nodes that process, transform, or interact with data). Mastering this mental model unlocks every other pattern in n8n.
Items and Arrays
n8n passes data between nodes as arrays of items. Each node processes each item individually by default — you never write loops. This is the paradigm shift that separates n8n thinking from traditional scripting.
Pinned Test Data
Pinning data on any trigger node freezes it for test runs. This is essential for development speed — you fill the form once, pin the data, and iterate on downstream logic freely.
The Reference Node Pattern
When conditional branches diverge (like True/False in an IF node), a No Operation node at the merge point gives you a single, clean reference point for downstream steps. Use this pattern consistently and your workflows will be far easier to maintain.
AI Agent vs. Basic LLM Chain
A Basic LLM Chain is a single model call with a prompt. An AI Agent is a reasoning loop that can invoke tools, evaluate results, and iterate. If your use case is more than question-answering on fixed prompts, you want the agent.
n8n AI Agent Templates and Community Resources
One of n8n’s biggest advantages is its community template library, thousands of pre-built workflow templates shared by practitioners worldwide. For AI agent use cases, this is the fastest way to go from idea to working prototype.
Particularly useful starting points include:
- n8n AI agent workflow templates for Slack, email, and CRM integrations
- n8n AI agent templates for customer support automation
- n8n AI automation templates for lead enrichment and scoring
- RAG (Retrieval-Augmented Generation) patterns using vector databases
For the code-curious, the n8n GitHub repository is also a goldmine, you’ll find community-contributed node configurations, agent examples, and workflow exports you can import directly.
And if you get stuck, the n8n community forums are genuinely one of the most helpful automation communities on the internet. Thousands of practitioners, real answers, no paywalls.
From Tutorial to Production: Where Dextralabs Comes In?
Following this tutorial, you now understand the mechanics of n8n AI agent development. You can build a form-to-chatbot pipeline, apply conditional logic, enrich data with LLMs, and deploy a grounded AI agent that doesn’t hallucinate.
That’s genuinely impressive for a day’s work.
But production AI agents, the kind that handle thousands of users, integrate with enterprise systems, maintain SLAs, and evolve intelligently over time, require a different level of engineering.
That’s what Dextralabs does.
We are an AI agent development company specializing in designing, building, and deploying custom AI agent systems for businesses at scale. Our team combines deep expertise in LLM orchestration, workflow automation, and enterprise integration to deliver solutions that create real, measurable business value.
What separates a tutorial project from a Dextralabs production deployment:
- Scalable architecture — Multi-agent systems with task decomposition, routing, and fallback logic. Read our deep dive on scalable AI agent architecture.
- Enterprise integrations — CRMs, ERPs, proprietary databases, custom APIs, SSO — connected cleanly and securely
- Observability and monitoring — Full audit trails, LLM cost tracking, performance dashboards
- Hallucination guardrails — Production-grade retrieval pipelines, confidence scoring, and graceful degradation
- Ongoing optimization — Prompt refinement, model upgrades, and agent capability expansion as your needs evolve
Whether you’re starting from scratch or scaling an existing automation initiative, our team can help you move faster and build smarter. Explore our AI agent development services or read how we approach building AI agents end-to-end.
🚀 Ready to go beyond tutorials?
Dextralabs works with teams across industries to build production AI agent systems on platforms like n8n, LangChain, and custom architectures.
Let’s Talk to Our AI Consulting ExpertsQuick Reference: What We Built?
| Component | What It Does |
| On Form Submission | Captures Q&A data via web form |
| IF Node | Routes by email domain for trust logic |
| Edit Fields Node | Appends isTrusted boolean metadata |
| No Operation (ref) | Merges branches into a clean reference point |
| Basic LLM Chain | Generates semantic tags via OpenAI |
| Data Table (insert) | Stores enriched submissions in n8n native DB |
| On Chat Message | Triggers the AI agent on each user message |
| AI Agent Node | Orchestrates reasoning, memory, and tool calls |
| Simple Memory | Maintains conversation context across messages |
| Data Table (tool) | Lets the agent query the knowledge base |
| System Prompt | Defines agent role and enforces grounded answers |
Final Thoughts: The Fundamentals Are the Competitive Edge
There’s a temptation to reach for AI workflow builders that generate everything for you automatically. And sometimes that’s the right call. But as this tutorial shows, understanding the fundamentals, how triggers and actions work, how items flow through nodes, how memory and tools extend an AI agent’s capabilities — gives you something an auto-generated workflow can’t: the ability to debug, evolve, and scale what you build.
You just built a grounded, memory-enabled AI agent with a structured knowledge ingestion pipeline. That’s not a toy — that’s the architecture underlying real enterprise automation systems.
Now go build something that matters.
And when you’re ready to take it to production scale, Dextralabs is here.
Frequently Asked Questions (FAQs):
Is n8n really free to use for AI agent development?
Yes. n8n’s community edition is fully free to self-host, including all AI nodes. You only pay for your own LLM API usage (e.g., OpenAI tokens). The cloud version has a free trial. For teams doing serious automation, the paid cloud tiers add collaboration, versioning, and SLA support.
Can I build n8n AI agents without coding?
Mostly yes. The visual workflow builder covers the vast majority of use cases without writing code. The optional Code node lets you drop in JavaScript or Python for edge cases, but the AI, data, and logic nodes handle most workflows entirely visually.
Where can I find n8n AI agent templates?
The n8n template library at n8n.io/workflows has thousands of community-contributed workflows, including many AI agent templates. You can also search GitHub for n8n AI agent GitHub exports — the community actively shares complete workflow JSON files you can import directly.
What’s the difference between an n8n AI agent and a basic LLM call?
A basic LLM call sends a prompt, gets a response, done. An AI agent is a reasoning loop — it can choose tools, execute them, evaluate the results, and decide whether to call another tool or return an answer. Agents are what you want when the task requires dynamic decision-making.
How does Dextralabs help with n8n AI agent development?
Dextralabs helps businesses move from prototype to production. We design custom AI agent architectures, handle enterprise integrations, implement observability and guardrails, and own the full delivery lifecycle. Think of us as the team that takes what you built in this tutorial and turns it into something that runs your business.