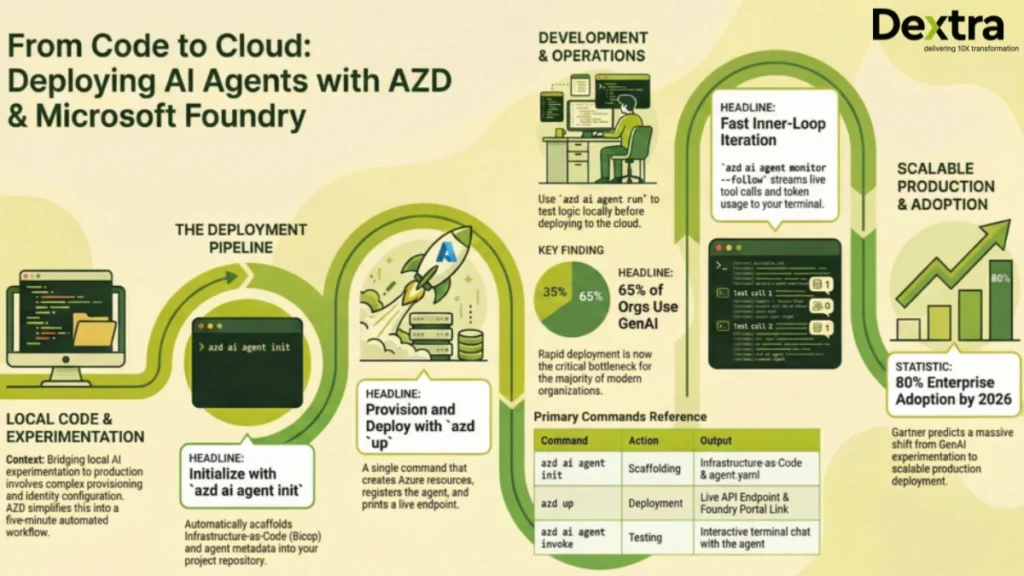
Deploying an AI agent to production on Microsoft Foundry used to take days. You had to manually provision a Foundry Hub, configure managed identities, wire model deployments, and set up monitoring, before writing a single line of agent logic. The Azure Developer CLI (azd) has compressed all of that into two commands and under five minutes.
According to McKinsey & Company, 65% of organizations now regularly use generative AI in at least one business function, nearly doubling year over year, making fast, reliable deployment a critical bottleneck.
At Dextra Labs, we are an enterprise AI agent development company headquartered in Singapore, with clients across the USA, UK, UAE, and India. We have deployed over 50 production AI agent systems on Azure. The azd workflow covered in this guide is now the standard we use on every Foundry engagement, and it has become one of the biggest time-savers in the field.
Gartner predicts that over 80% of enterprises will have deployed generative AI APIs or models into production by 2026, shifting the challenge from experimentation to scalable deployment.
This is a complete technical walkthrough. By the end, you will have a live AI agent deployed on Microsoft Foundry, invokable from the terminal, monitored in real time, and connected to a frontend chat UI, all with fewer than 10 commands.

What Is Microsoft Foundry?
Microsoft Foundry (formerly the Azure AI Studio agent hosting layer) is Azure’s managed production runtime for AI agents. It provides a hosted environment for agent definitions, integrated GPT-4o and Phi-3 model deployments, role-based access control via managed identity, a playground UI for interactive testing, and real-time log streaming. It is the recommended path for deploying enterprise AI agents on Azure.
What Is azd?
This open-source CLI accelerates the whole lifecycle of Azure-hosted applications. For AI agents, the Foundry team’s azd ai agent extension provides:

Before starting, make sure you have:
- VS Code installed
- Azure Developer CLI (azd) installed: install guide
- Git installed
- An Azure subscription with Microsoft Foundry access
- Model quota for GPT-4o (or your target model) in your target region
The Sample Agent: Seattle Hotel Concierge
For this walkthrough, we’ll use a Python-based hotel concierge agent. This is the key repository used throughout:
Agent repo: https://github.com/puicchan/seattle-hotel-agent Frontend chat app: https://github.com/puicchan/chat-app-foundry
Why this repo? It’s a clean, single-agent Python project that demonstrates tool use, multi-turn conversation and real-world prompt design , the same patterns Dextra Labs uses when scaffolding production agent projects for enterprise clients.
Step 1: Clone and Open the Agent Project
git clone https://github.com/puicchan/seattle-hotel-agent

cd seattle-hotel-agent

code.
Open the integrated terminal in VS Code. You’ll see a minimal Python agent project, an agent definition, some tool functions and a requirements.txt. No infrastructure files yet. That’s intentional; azd generates those.
Step 2: Authenticate with Azure
azd auth loginThis opens a browser window for Azure authentication. Once complete, azd has the credentials it needs to provision resources on your behalf.
Step 3: Initialize and Deploy
azd ai agent init

azd up
These two commands perform the majority of the work. Here’s exactly what happens:
azd ai agent initThis scaffolds the full Infrastructure-as-Code (IaC) definition into your repo:
your-project/

infra/main.bicep provisions:
- A Foundry Hub (top-level Azure AI resource container)
- A Foundry Project under the hub (where the agent lives)
- A Model deployment (e.g., GPT-4o with version and capacity config)
- A Managed Identity with RBAC role assignments so the agent can call the model securely
Here’s a simplified view of what the generated Bicep looks like:
// infra/main.bicep (simplified)

param location string = resourceGroup().location
param projectName string = 'seattle-hotel-agent'

resource aiHub 'Microsoft.MachineLearningServices/workspaces@2024-04-01' = {
  name: '${projectName}-hub'
  location: location
  kind: 'Hub'
  identity: {
    type: 'SystemAssigned'
  }
  properties: {
    friendlyName: '${projectName} Hub'
  }
}

resource aiProject 'Microsoft.MachineLearningServices/workspaces@2024-04-01' = {
  name: '${projectName}-project'
  location: location
  kind: 'Project'
  identity: {
    type: 'SystemAssigned'
  }
  properties: {
    hubResourceId: aiHub.id
    friendlyName: '${projectName}'
  }
}

resource modelDeployment 'Microsoft.CognitiveServices/accounts/deployments@2024-04-01-preview' = {
  name: 'gpt-4o'
  parent: openAIAccount
  sku: {
    name: 'GlobalStandard'
    capacity: 10
  }
  properties: {
    model: {
      format: 'OpenAI'
      name: 'gpt-4o'
      version: '2024-11-20'
    }
  }
}

agent.yaml defines the agent's metadata and runtime configuration:
# agent.yaml
name: seattle-hotel-agent
description: A hotel concierge agent for Seattle properties
model: gpt-4o
instructions: |
  You are a helpful hotel concierge for Seattle properties.
  You help guests find available suites, answer questions about amenities,
  and handle booking inquiries. Be friendly, professional, and concise.
tools:
  - type: function
    function:
      name: check_suite_availability
      description: Check available suites for given dates
      parameters:
        type: object
        properties:
          check_in: { type: string, description: "Check-in date (YYYY-MM-DD)" }
          check_out: { type: string, description: "Check-out date (YYYY-MM-DD)" }
          suite_type: { type: string, enum: ["standard", "deluxe", "penthouse"] }
        required: [check_in, check_out]
env:
  AZURE_OPENAI_ENDPOINT: ${AZURE_OPENAI_ENDPOINT}
  AZURE_AI_FOUNDRY_PROJECT: ${AZURE_AI_FOUNDRY_PROJECT}
This command runs the full provisioning and deployment pipeline:
- Runs the Bicep deployment and creates all Azure resources
- Uploads your agent definition to Foundry
- Registers the agent endpoint
- Prints a direct link to the Foundry portal
Success: Your UP workflow for provisioning and deploying to Azure completed in 4 minutes and 32 seconds.
– Resource Group: rg-seattle-hotel-agent
– Foundry Hub: seattle-hotel-agent-hub
– Foundry Project: seattle-hotel-agent-project
– Agent Endpoint: https://seattle-hotel-agent-project.api.azureml.ms/agents/v1.0/…
Open in Foundry Portal: https://ai.azure.com/…
We own all the generated artifacts. The Bicep lives in your repo, version-controlled, auditable and customizable. This is how we approach every production agent deployment at Dextra Labs: infrastructure as code from day one, not as an afterthought.
Step 4: Try It in the Foundry Playground
Click the Foundry portal link from the azd up output. You’ll land directly on your agent’s playground, a chat UI where you can test the agent interactively.
Try a question like:
“What penthouse suites are available at the downtown Seattle hotel for the weekend of April 12th?”
The agent will invoke its tool, return availability data and respond naturally, all running on your deployed infrastructure.
Step 5: Invoke the Agent from the Terminal
You don’t need the browser to interact with your agent. From VS Code’s terminal:
azd ai agent invokeThis opens an interactive terminal session with your remote agent endpoint. Multi-turn conversation is preserved across prompts , the CLI manages conversation state for you.
> You: What suites are available this weekend?
> Agent: I’d be happy to check availability for this weekend (April 12–13).
We currently have the following available:
– Deluxe Suite (Floor 8) , $420/night
– Penthouse Suite (Floor 22), $890/night
Would you like to proceed with a booking?
> You: Tell me more about the penthouse
> Agent: The Penthouse Suite on Floor 22 offers panoramic views of Puget Sound…
Tip: By default, azd ai agent invoke targets the remote endpoint. When a local agent is running (see Step 6), it automatically routes to the local instance.
Step 6: Run Locally for Development
When you’re iterating on agent logic, refining instructions, adding tools, debugging responses and redeploying to Azure on every change, it’s too slow. Run the agent locally instead:
azd ai agent runThis starts the agent on your local machine, pointing at the same Azure-hosted model. Now pair it with invoke in a second terminal:
# Terminal 1

azd ai agent run

# Terminal 2

azd ai agent invoke
Edit your agent.yaml or tool functions, restart with azd ai agent run and invoke again. No redeployment needed. This is the inner loop that Dextra Labs uses during agent development, allowing for fast local iteration against real model endpoints, with production deployment as the final step.
The Agent’s Python Tool Implementation
Here’s what a production-quality tool implementation looks like in the agent’s Python code:
# tools/availability.py

import json
from datetime import datetime
from typing import Optional

# In production, this connects to your actual booking system
MOCK_INVENTORY = {
    "standard": [f"Room {i}" for i in range(101, 120)],
    "deluxe": [f"Suite {i}" for i in range(201, 210)],
    "penthouse": ["Penthouse Suite Floor 22", "Penthouse Suite Floor 23"],
}

def check_suite_availability(
    check_in: str,
    check_out: str,
    suite_type: Optional[str] = None
) -> str:
    """
    Check available suites for given dates.
    Returns JSON string with availability data.
    """
    try:
        check_in_dt = datetime.strptime(check_in, "%Y-%m-%d")
        check_out_dt = datetime.strptime(check_out, "%Y-%m-%d")

        if check_out_dt <= check_in_dt:
            return json.dumps({"error": "Check-out must be after check-in"})

        nights = (check_out_dt - check_in_dt).days

        # Filter by suite type if specified
        if suite_type and suite_type in MOCK_INVENTORY:
            available = MOCK_INVENTORY[suite_type]
            result = {suite_type: available}
        else:
            result = MOCK_INVENTORY

        return json.dumps({
            "available": result,
            "check_in": check_in,
            "check_out": check_out,
            "nights": nights,
            "currency": "USD"
        })

    except ValueError as e:
        return json.dumps({"error": f"Invalid date format: {str(e)}"})

# agent.py , main agent runner

import os
from azure.ai.projects import AIProjectClient
from azure.identity import DefaultAzureCredential
from tools.availability import check_suite_availability
import json

def run_agent():
    client = AIProjectClient(
        endpoint=os.environ["AZURE_AI_FOUNDRY_ENDPOINT"],
        credential=DefaultAzureCredential(),
    )

    # Tool dispatcher
    def handle_tool_call(tool_name: str, arguments: dict) -> str:
        if tool_name == "check_suite_availability":
            return check_suite_availability(**arguments)
        return json.dumps({"error": f"Unknown tool: {tool_name}"})

    # Start a thread
    thread = client.agents.create_thread()

    print("Seattle Hotel Concierge ready. Type 'exit' to quit.\n")

    while True:
        user_input = input("You: ").strip()
        if user_input.lower() == "exit":
            break

        # Add user message
        client.agents.create_message(
            thread_id=thread.id,
            role="user",
            content=user_input
        )

        # Run the agent
        run = client.agents.create_and_process_run(
            thread_id=thread.id,
            agent_id=os.environ["AZURE_AI_AGENT_ID"]
        )

        # Handle tool calls if needed
        if run.status == "requires_action":
            tool_outputs = []
            for tool_call in run.required_action.submit_tool_outputs.tool_calls:
                args = json.loads(tool_call.function.arguments)
                output = handle_tool_call(tool_call.function.name, args)
                tool_outputs.append({
                    "tool_call_id": tool_call.id,
                    "output": output
                })
            run = client.agents.submit_tool_outputs_and_poll(
                thread_id=thread.id,
                run_id=run.id,
                tool_outputs=tool_outputs
            )

        # Get the response
        messages = client.agents.list_messages(thread_id=thread.id)
        latest = messages.data[0]
        print(f"\nAgent: {latest.content[0].text.value}\n")

if __name__ == "__main__":
    run_agent()
Step 7: Monitor in Real Time
Once deployed and serving traffic, stream logs directly from your terminal:
# Print the last 50 log entries and exit
azd ai agent monitor
# Stream continuously as requests come in
azd ai agent monitor –follow
When –follow is active, every request and response flows through your terminal in real time. This is invaluable in production; you can see exactly what your agent is receiving, which tools it’s calling and what it’s returning, without opening Azure Monitor or Log Analytics.
[2026-03-28 14:32:01] INFO Thread created: thread_abc123
[2026-03-28 14:32:01] INFO User message: “What suites are available this weekend?”
[2026-03-28 14:32:02] INFO Tool call: check_suite_availability(check_in=”2026-04-12″, check_out=”2026-04-13″)
[2026-03-28 14:32:02] INFO Tool response: {“available”: {“deluxe”: […], “penthouse”: […]}, “nights”: 1}
[2026-03-28 14:32:03] INFO Agent response generated (312 tokens)
[2026-03-28 14:32:03] INFO Run completed: run_xyz789
Step 8: Check Agent Health
azd ai agent show
This returns the deployment status, endpoint URL, agent version and key metadata , a quick sanity check before a demo or after a deployment.
Step 9: Wire Up a Frontend Chat App
For a full end-to-end experience with a real UI:
git clone https://github.com/puicchan/chat-app-foundry
cd chat-app-foundry
Set environment variables from your agent deployment (run azd env get-values in the agent project directory to find these):
azd env set AZURE_AI_AGENT_NAME “seattle-hotel-agent”
azd env set AZURE_AI_AGENT_VERSION “<version-number>”
azd env set AI_ACCOUNT_NAME “<your-ai-account-name>”
azd env set AI_ACCOUNT_RESOURCE_GROUP “<your-resource-group>”
azd env set AZURE_AI_FOUNDRY_ENDPOINT “<your-foundry-endpoint>”
Deploy the chat app:
azd up
Now open a second terminal and stream logs:
azd ai agent monitor –follow
Ask a question in the chat UI and watch the log light up in your terminal simultaneously. This is the complete production loop: user input → Foundry agent → tool execution → response → back to the UI, all observable in real time.
Step 10: Clean Up
azd down
Removes the resource group and all provisioned resources; no lingering charges.
CI/CD Integration
The same azd workflow plugs directly into GitHub Actions. To deploy on every push to main:
# .github/workflows/deploy.yml

name: Deploy AI Agent

on:
  push:
    branches: [main]

jobs:
  deploy:
    runs-on: ubuntu-latest
    steps:
      - uses: actions/checkout@v4

      - name: Install azd
        uses: Azure/setup-azd@v1

      - name: Log in to Azure
        uses: azure/login@v2
        with:
          client-id: ${{ secrets.AZURE_CLIENT_ID }}
          tenant-id: ${{ secrets.AZURE_TENANT_ID }}
          subscription-id: ${{ secrets.AZURE_SUBSCRIPTION_ID }}

      - name: Deploy agent
        run: azd up --no-prompt
        env:
          AZURE_ENV_NAME: production
          AZURE_LOCATION: eastus

For multi-environment management (dev → staging → production), use azd env:
azd env new staging
azd env select staging
azd up
Each environment gets its Azure resource group, its own agent endpoint and its own configuration, all managed with the same commands.
Architecture Overview
Here’s the full picture of what gets provisioned:

The managed identity means no API keys in your code or environment. The agent authenticates to the model via DefaultAzureCredential, which resolves to the managed identity in production and your local Azure login during development.
What Dextra Labs Does Differently?
At Dextra Labs, we don’t just deploy sample agents , we build agents that go to production in enterprise environments. Here’s how our approach extends beyond the basics covered here:
- Production Hardening: We add retry logic, fallback models, circuit breakers and graceful degradation to every agent we ship. An agent that fails silently is worse than one that fails loudly.
- Evaluation Pipelines: Before any agent is launched, it goes through a series of automated tests, including checking its performance with a standard dataset, measuring how fast azd CI/CD triggers the evals; the agent doesn’t deploy if it doesn’t pass.
- Multi-Agent Architectures: For complicated tasks, we create several specialized agents, including a routing agent, a data retrieval agent and a response synthesis agent, each set up as its own Foundry endpoint and managed by a coordinator.
- Custom Tool Ecosystems: We wire agents to enterprise systems, CRMs, ERPs, internal APIs and proprietary databases with proper authentication, rate limiting and error handling baked in from day one.
- Observability Beyond Logs: We integrate Application Insights with custom metrics, token usage per conversation, tool call latency and success/failure rates by tool so engineering teams can make data-driven decisions about agent improvements.
If you’re building an AI agent for production, not just a demo, talk to the Dextra Labs team. We’ve shipped agents across fintech, healthcare, enterprise SaaS and operations automation and we know where the sharp edges are before you hit them.
Quick Reference: Full Command Set
# Initial setup
git clone https://github.com/puicchan/seattle-hotel-agent
cd seattle-hotel-agent
azd auth login
azd ai agent init
azd up

# Development loop
azd ai agent run          # Run locally
azd ai agent invoke       # Test (routes to local if running, else remote)

# Production operations
azd ai agent monitor --follow   # Stream real-time logs
azd ai agent show               # Check health + metadata

# Cleanup
azd down
Conclusion
The azd ai agent workflow compresses what used to be days of infrastructure work into under five minutes. From cloning a repo to having a live, invokable, monitored AI agent on Microsoft Foundry, two commands (azd ai agent init + azd up) get you there.
But deployment is just the beginning. The real work is in building agents that are robust, observable and valuable in production. That’s the problem Dextra Labs solves every day; we build production-ready AI agents that don’t just demo well, they perform at scale.
Building a production AI agent? Talk to the team that has shipped 50+ of them.
Dextra Labs is an enterprise AI agent development company based in Singapore, with clients across the USA, UK, UAE, and India. We do not just deploy demo agents, we build systems that handle real workflows, integrate with your enterprise data, and perform reliably at scale on Microsoft Azure and other platforms.
- Production-hardened agent architectures with retry logic, fallbacks, and circuit breakers
- Automated evaluation pipelines; agents only ship when they pass
- Multi-agent systems, custom tool ecosystems, and full observability via Application Insights
- Deployments in regulated industries: fintech, healthcare, enterprise SaaS, operations
FAQs:
What does azd ai agent init do?
azd ai agent init scaffolds the full infrastructure-as-code definition for your AI agent project. It generates a main.bicep file that provisions a Foundry Hub, a Foundry Project, a model deployment (e.g. GPT-4o), and a managed identity with RBAC role assignments. It also creates an agent.yaml file defining the agent’s name, model, instructions, and tools.
What is the difference between azd ai agent run and azd ai agent invoke?
azd ai agent run starts your agent locally on your machine, pointing at your Azure-hosted model, used during development for rapid iteration without redeployment. azd ai agent invoke opens an interactive terminal chat session with the agent. It automatically routes to the local instance if one is running, and to your remote Foundry endpoint if not.
How long does it take to deploy an AI agent to Microsoft Foundry?
Using the Azure Developer CLI with azd ai agent init followed by azd up, full deployment, including resource provisioning, model deployment, identity configuration, and agent registration, completes in approximately 4–5 minutes. This compares to hours or days when configuring the same infrastructure manually through the Azure Portal.
Do I need API keys to connect my AI agent to Azure OpenAI on Foundry?
No. The azd-generated infrastructure uses a managed identity with RBAC role assignments. Your agent authenticates to the model via DefaultAzureCredential, which resolves to the managed identity in production and to your local Azure login during development. No API keys are stored in your code or environment variables.
Can I use this azd workflow for enterprise AI agent deployment in Singapore, USA, or UK?
Yes. The azd workflow is region-agnostic and deploys to any Azure region where Microsoft Foundry and your target model (e.g. GPT-4o) are available. At Dextra Labs, we use this same pipeline for enterprise AI agent deployments across Singapore, USA, UK, UAE, and India, adapting the region, compliance configuration, and model selection to each client’s requirements.